
2022 Volvo S90 Recharge Plug-in Hybrid Emergency puncture repair

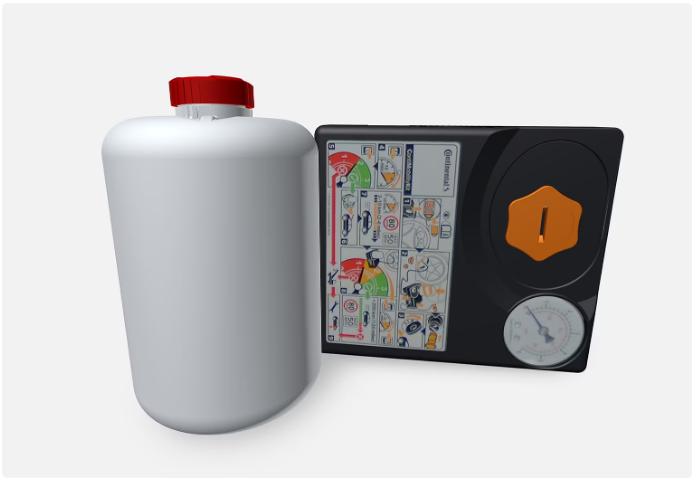
Emergency puncture repair kit
The emergency puncture repair kit (TMK) is used to seal a puncture as well as to check and adjust the air pressure in the tyre.
Cars equipped with spare tyres do not have the emergency puncture repair kit.
The puncture repair kit consists of a compressor and a bottle with sealing fluid. The sealing works as a temporary repair.
Note
The sealing fluid is effective at sealing tyres with tread punctures but has limited ability to seal tyres with sidewall punctures. Do not use the emergency puncture repair kit on tyres displaying larger slits, cracks or similar damage.
Note
The compressor is intended for a temporary emergency puncture repair and is approved by Volvo.
Location
The puncture repair kit is located in the foam block under the cargo area floor.
Sealing fluid expiry date
The bottle of sealing fluid must be replaced if the bottle’s expiry date has passed (see the decal on the bottle). Treat the old bottle as environmentally hazardous waste.
Inflating tyres with the compressor from the puncture repair kit
The car’s original tyres can be inflated using the compressor in the emergency puncture repair kit.
- The compressor must be switched off. Make sure that the switch is in position 0 (Off), and take out the electrical cable and the air hose.
- Unscrew the tyre’s dust cap and screw in the air hose’s valve connection to the bottom of the thread on the tyre’s air valve.
Check that the pressure-reducing valve on the air hose is fully screwed in. - Connect the electrical cable to the closest 12 V socket and start the car.
Warning
Inhaling car exhaust fumes could result in danger to life. Never leave the engine running in sealed areas or areas that lack sufficient ventilation.
Warning
Do not leave children in the car without supervision when the car is running.
Start the compressor by flicking the switch to position I (On).
Important
Risk of overheating. The compressor must not run for more than 10 minutes.
Inflate the tyre to the pressure specified on the tyre pressure label on the driver-side door pillar. Release air using the pressure-reducing valve if the tyre pressure is too high.
Switch off the compressor. Detach the air hose and the electrical cable.
Refit the dust cap on the tyre.
Note
- After a tyre has been inflated, always refit the dust cap in order to avoid damage to the valve from gravel, dirt, etc.
- Only use plastic dust caps. Metal dust caps can rust and become difficult to unscrew.
Note
The compressor is an electrical device. Follow local regulations related to waste management.
Using a puncture repair kit
The emergency puncture repair kit (TMK) can be used to seal a puncture. Read through all instructions before use.
Overview
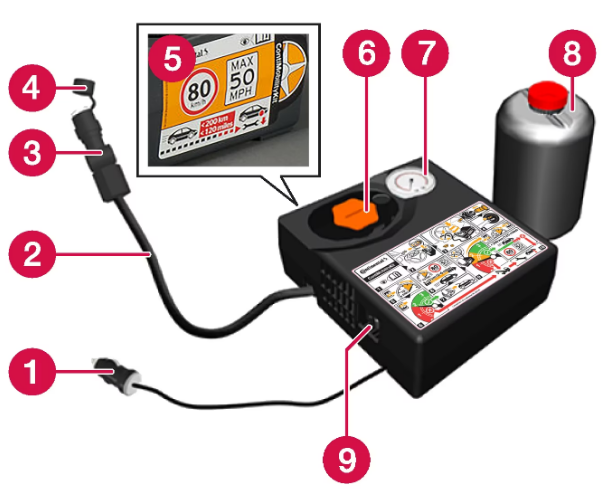
- Electrical cable
- Air hose
- Pressure reducing valve
- Protective cap
- Label, maximum permitted speed
- Bottle holder (orange cap)
- Pressure gauge
- Sealing fluid bottle
- Switch
Connecting
Note
Do not break the bottle’s seal before use. The seal has broken automatically when the bottle is screwed in.
Warning
Please keep the following points in mind when using the tyre sealing system:
- The sealing fluid bottle contains 1) rubber latex, natural and 2) ethanediol. These substances are harmful if swallowed.
- The contents of this bottle may cause allergic skin reactions or otherwise be potentially harmful to the respiratory tract, the skin, the central nervous system, and the eyes.
Precautions:
- Store out of the reach of children.
- Harmful if ingested.
- Avoid prolonged or repeated contact with the skin. If sealing fluid has come into contact with your clothes, remove them.
- Wash thoroughly after handling.
First aid:
- Skin: Wash affected areas of skin with soap and water. Get medical attention if symptoms occur.
- Eyes: Flush with plenty of water for least 15 minutes, occasionally lifting the upper and lower eyelids. Get medical attention if symptoms occur.
- Inhalation: Move the exposed person to fresh air. If irritation persists, get medical attention.
- Ingestion: Do NOT induce vomiting unless directed to do so by medical personnel. Get medical attention.
- Disposal: Dispose of this material and its container at a hazardous or special waste collection point.
Warning
Do not remove the bottle or air hose while the puncture repair kit is being used.
Note
If the puncture was caused by a nail or similar, leave it in the tyre. It helps to seal the hole.
Preparations
Set up the warning triangle and activate the hazard warning lights if a tyre is being sealed in a trafficked location.
Detach the decal for the maximum permitted speed that is affixed on one side of the compressor. Affix it visibly on the windscreen as a reminder to observe the speed limit. You should not drive faster than 80 km/h (50 mph) after the emergency tyre repair kit has been used.
Check that the switch is in position 0 (Off) and locate the electrical cable and the air hose.
Unscrew the orange-coloured cap from the compressor and unscrew the cork from the sealing fluid bottle.
Screw in the bottle to the bottom of the bottle holder.
The bottle and the bottle holder are equipped with a reverse catch to prevent sealant leakage. When the bottle is screwed in it cannot be unscrewed from the bottle holder again. The bottle must be removed at a workshop.
Warning
Do not unscrew the bottle, it is equipped with a reverse catch to prevent leakage.
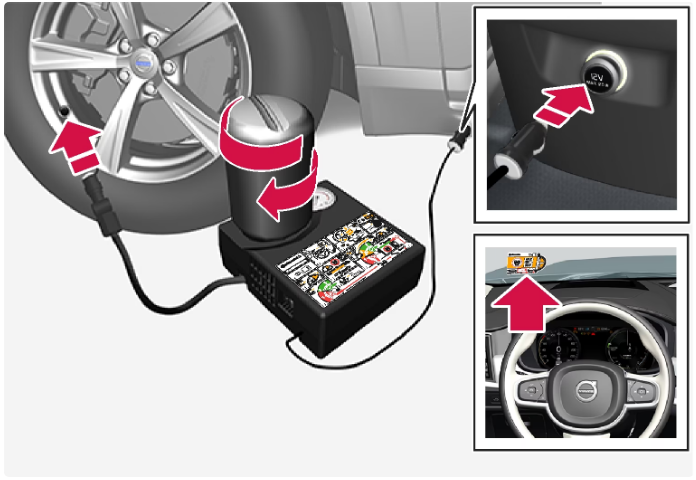
Unscrew the tyre’s dust cap and screw in the air hose’s valve connection to the bottom of the thread on the tyre’s air valve.
Check that the pressure-reducing valve on the air hose is fully screwed in.
Begin puncture repair
Connect the electrical cable to the closest 12 V socket and start the car.
Note
Make sure that none of the other 12 V sockets is in use when the compressor is operating.
Warning
Do not leave children in the car without supervision when the car is running.
Warning
Inhaling car exhaust fumes could result in danger to life. Never leave the engine running in sealed areas or areas that lack sufficient ventilation.
Start the compressor by flicking the switch to position I (On).
When the compressor starts, the pressure can increase up to 6 bar (88 psi), but the pressure drops after about 30 seconds.
Warning
Never stand next to the tyre when the compressor is running. If cracks or unevenness arise then the compressor must be switched off immediately. The journey should not be continued. Call roadside assistance for recovery to a tyre centre. Volvo recommends an authorised tyre centre.
Inflate the tyre for 7 minutes.
Important
The compressor must not be operated for longer than 10 minutes – risk of overheating.
Switch off the compressor to check the pressure on the pressure gauge. The minimum pressure is 1.8 bar (26 psi) and the maximum is 3.5 bar (51 psi). Release air by pressing the pressure-reducing valve if the tyre pressure is too high.
Warning
If the pressure is below 1.8 bar (26 psi) then the hole in the tyre is too big. The journey should not be continued. Call roadside assistance for recovery to a tyre centre. Volvo recommends an authorised tyre centre.
Switch off the compressor and detach the electrical cable.
Unscrew the air hose from the tyre valve and refit the dust cap on the tyre.
Note
- After a tyre has been inflated, always refit the dust cap in order to avoid damage to the valve from gravel, dirt, etc.
- Only use plastic dust caps. Metal dust caps can rust and become difficult to unscrew.
Fit the protective cap on the air hose in order to avoid leakage of the remaining sealing fluid. Place the equipment in the cargo area.
As soon as possible, drive at least 3 km (2 miles) at a maximum speed of 80 km/h (50 mph) so that the sealing fluid can seal the tyre, and then perform a follow-up check.
Warning
The sealant will spurt out of the puncture during the first few rotations of the tyre. Make sure that nobody is standing near the car and gets the sealing fluid splashed onto them when the car is driven away. The distance should be at least 2 metres (7 feet).
Follow-up inspection
Connect the air hose on the tyre valve and screw in the valve connection to the bottom of the tyre valve’s thread. The compressor must be switched off.
Read the tyre pressure on the pressure gauge.
- If it is below 1.3 bar (19 psi) then the tyre is insufficiently sealed. The journey should not be continued. Call roadside assistance for recovery.
- If the tyre pressure is higher than 1.3 bar (19 psi), the tyre must be inflated to the pressure specified in accordance with the tyre pressure label on the driver’s side door pillar (1 bar = 100 kPa = 14.5 psi). Release air using the pressure-reducing valve if the tyre pressure is too high.
Warning
Check the tyre pressure regularly.
Volvo recommends that the car is driven to the nearest authorised Volvo workshop for the replacement/repair of the damaged tyre. Advise the workshop that the tyre contains sealing fluid.
The sealing fluid bottle and hose must be replaced after use. Volvo recommends that these replacements be performed by an authorised Volvo workshop.
Warning
Maximum mileage with tyres containing sealing fluid is 200 km (120 miles).
Note
The compressor is an electrical device. Follow local regulations related to waste management.